See, I have this problem. The older I get, the more "old-lady-ish" my upper arms get. And I no longer wear sleeveless or even short-sleeved shirts. It seems that most of the cute t-shirts that are made these days are made with very short sleeves, and even "capped" sleeves. They don't work for me, so I finally decided to do something about it. Once I figured it out, I thought I'd share what I learned with you.
 |
| Before |
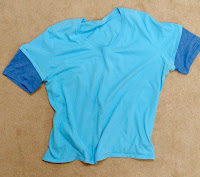 |
| After |
|
|
|
If you have t-shirts with too- short sleeves, you can make
them longer by adding faux layered sleeves. Most of us have old t-shirts that we don't wear anymore ... let's cannibalize them for parts!
First, measure the diameter of the too-short t-shirt sleeve hem
(“target sleeve”). Lay the sleeve
flat and measure straight along the sleeve hem.
From an existing sleeve of a discarded shirt: cut it off at a point that closely matches
the diameter measurement you’ve taken of your target sleeve. For instance, if your target sleeve diameter
measures 8”, your newly-cut sleeve diameter (at the cut edge) can measure from
8” to about 8-1/2” diameter at the cut.
(If the new sleeve is much larger, you can simply narrow it
by taking a larger “bite” out of the existing inner seam to make it the
diameter you desire.)
Turn the newly-cut sleeve length inside out, and insert it,
cuff-side first, down into the shorter ("target") sleeve … making sure wrong sides are together … aligning
the new raw edge with the hem stitching line of the old sleeve. You will be working (pinning) inside the existing
sleeve for this next step, although you can turn it slightly back in your hand to
facilitate pinning.
Matching first at the underarm seams, secure with a single pin at the underarm seam. Then, starting at the center-shoulder, pin
all the way around each side, working towards the underarm seam, making sure
not to stretch either fabric. If your
new sleeve is slightly larger around than the existing sleeve, this will allow
for some slight easing at the underarm.
Clip into the new fabric at the underarm, if necessary, so you can
slightly overlap any excess fabric, as shown below.
Below is a picture of the new sleeve (on the right) pinned
onto the inside of the (flipped back) existing sleeve of the t-shirt (on the
left). For the photo, I've also pulled the new sleeve out from the inside of the t-shirt, where it had been tucked for the pinning process.
Before taking it to the sewing machine, I find it easier to
now turn the shirt entirely inside-out, and flip the new sleeve back to expose the
newly-pinned-on sleeve addition (see below). This
will allow easy stitching on the free-arm of your sewing machine. (If you don’t use a free-arm, you may find it
easier to leave the shirt right-side-out, and sew it that way.)
I find that when using horizontally-placed straight pins,
and sewing slowly with a zig-zag stitch, I can safely sew over the pins
without removing them. However, do
remove them if you feel more comfortable doing so.
Beginning just past the underarm seam, stitch slowly with a
zig-zag stitch , being careful not to stretch either fabric; and as you come back around towards the
underarm seam, ease any overlap at the underarm seam, and complete the
zig-zag seam. The completed faux-layered t-shirt sleeve is shown below.
You can now turn the shirt right-side out and admire your
new “layered” t-shirt! (The one shown below is a different t-shirt, with longer added sleeves ... but the same technique.)
I hope you enjoy this process as much as I did. Since I'm not a garment seamstress, any technique that allows me to alter existing garments is a bonus for me!
BONUS Hint: If you don't have a lot of discardable t-shirts laying around, you can pick them up really cheap at a thrift shop or Goodwill store. Lots of great colors to go with your fun t-shirts, and all you have to look at are the sleeves! I never pay over 99 cents for them.


